STACK AND FUNCTIONS
In this part we will look into a special memory region of the process called the Stack. This chapter covers Stack’s purpose and operations related to it. Additionally, we will go through the implementation, types and differences of functions in ARM.
STACK
Generally speaking, the Stack is a memory region within the program/process. This part of the memory gets allocated when a process is created. We use Stack for storing temporary data such as local variables of some function, environment variables which helps us to transition between the functions, etc. We interact with the stack using PUSH and POP instructions. As explained in Part 4: Memory Instructions: Load And Store PUSH and POP are aliases to some other memory related instructions rather than real instructions, but we use PUSH and POP for simplicity reasons.
Before we look into a practical example it is import for us to know that the Stack can be implemented in various ways. First, when we say that Stack grows, we mean that an item (32 bits of data) is put on to the Stack. The stack can grow UP (when the stack is implemented in a Descending fashion) or DOWN (when the stack is implemented in a Ascending fashion). The actual location where the next (32 bit) piece of information will be put is defined by the Stack Pointer, or to be precise, the memory address stored in the SP register. Here again, the address could be pointing to the current (last) item in the stack or the next available memory slot for the item. If the SP is currently pointing to the last item in the stack (Full stack implementation) the SP will be decreased (in case of Descending Stack) or increased (in case of Ascending Stack) and only then the item will placed in the Stack. If the SP is currently pointing to the next empty slot in the Stack, the data will be first placed and only then the SP will be decreased (Descending Stack) or increased (Ascending Stack).
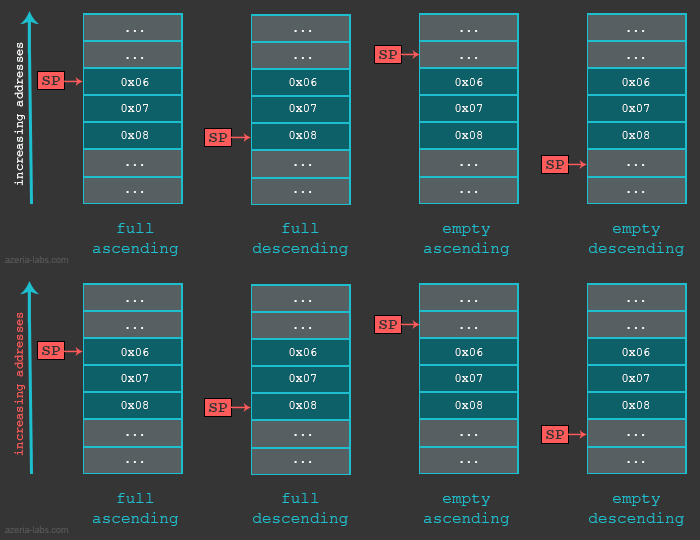
As a summary of different Stack implementations we can use the following table which describes which Store Multiple/Load Multiple instructions are used in different cases.

In our examples we will use the Full descending Stack. Let’s take a quick look into a simple exercise which deals with such a Stack and it’s Stack Pointer.
/* azeria@labs:~$ as stack.s -o stack.o && gcc stack.o -o stack && gdb stack */
.global main

main:
     mov   r0, #2  /* set up r0 */
     push  {r0}    /* save r0 onto the stack */
     mov   r0, #3  /* overwrite r0 */
     pop   {r0}    /* restore r0 to it's initial state */
     bx    lr      /* finish the program */
At the beginning, the Stack Pointer points to address 0xbefff6f8 (could be different in your case), which represents the last item in the Stack. At this moment, we see that it stores some value (again, the value can be different in your case):
gef> x/1x $sp
0xbefff6f8: 0xb6fc7000
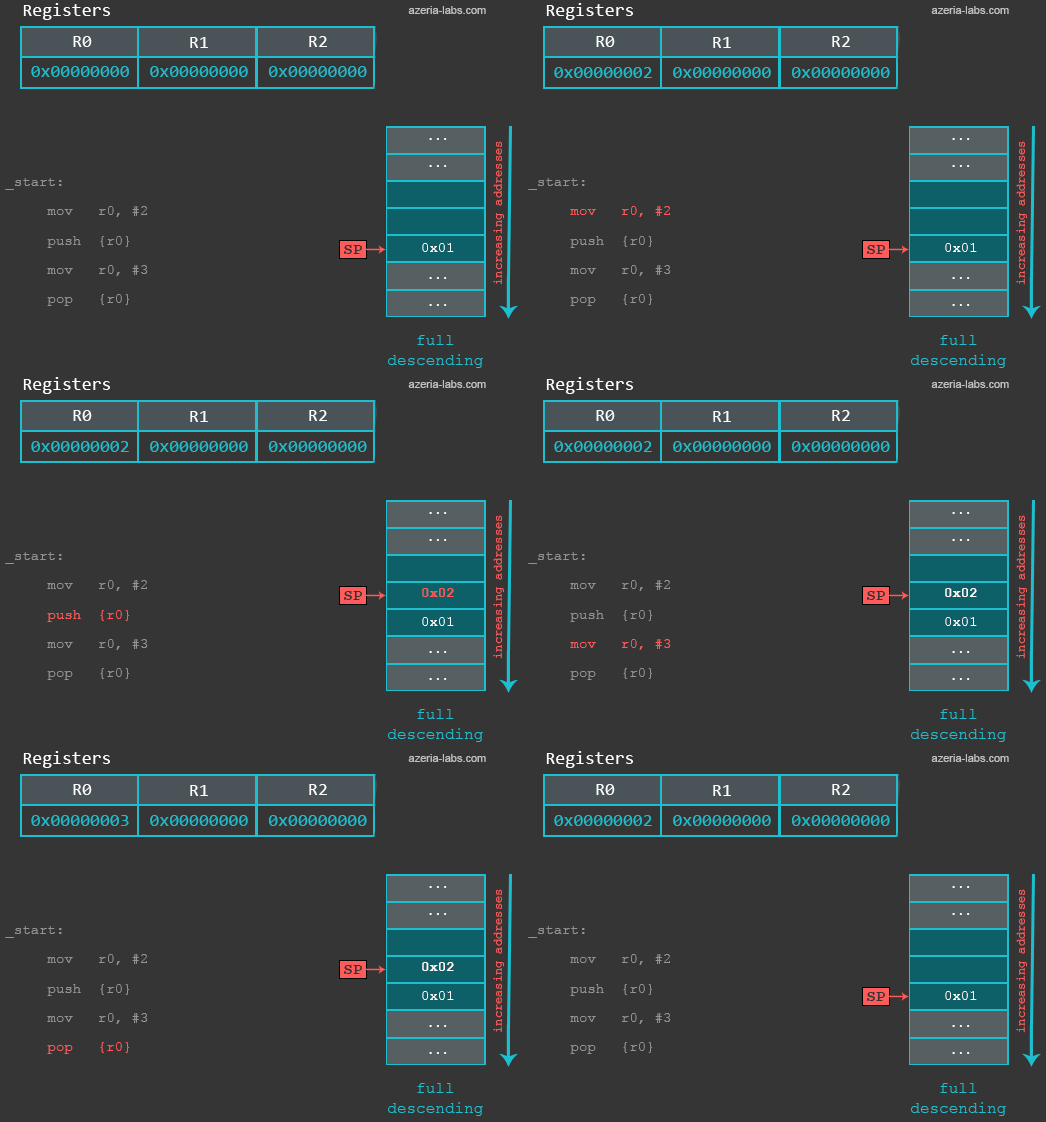
After executing the first (MOV) instruction, nothing changes in terms of the Stack. When we execute the PUSH instruction, the following happens: first, the value of SP is decreased by 4 (4 bytes = 32 bits). Then, the contents of R0 are stored to the new address specified by SP. When we now examine the updated memory location referenced by SP, we see that a 32 bit value of integer 2 is stored at that location:
gef> x/x $sp
0xbefff6f4: 0x00000002
The instruction (MOV r0, #3) in our example is used to simulate the corruption of the R0. We then use POP to restore a previously saved value of R0. So when the POP gets executed, the following happens: first, 32 bits of data are read from the memory location (0xbefff6f4) currently pointed by the address in SP. Then, the SP register’s value is increased by 4 (becomes 0xbefff6f8 again). The register R0 contains integer value 2 as a result.
gef> info registers r0
r0       0x2          2
(Please note that the following gif shows the stack having the lower addresses at the top and the higher addresses at the bottom, rather than the other way around like in the first illustration of different Stack variations. The reason for this is to make it look like the Stack view you see in GDB)
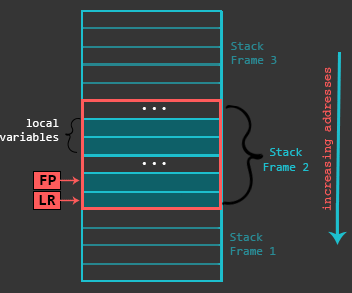
We will see that functions take advantage of Stack for saving local variables, preserving register state, etc. To keep everything organized, functions use Stack Frames, a localized memory portion within the stack which is dedicated for a specific function. A stack frame gets created in the prologue (more about this in the next section) of a function. The Frame Pointer (FP) is set to the bottom of the stack frame and then stack buffer for the Stack Frame is allocated. The stack frame (starting from it’s bottom) generally contains the return address (previous LR), previous Frame Pointer, any registers that need to be preserved, function parameters (in case the function accepts more than 4), local variables, etc. While the actual contents of the Stack Frame may vary, the ones outlined before are the most common. Finally, the Stack Frame gets destroyed during the epilogue of a function.
Here is an abstract illustration of a Stack Frame within the stack:
As a quick example of a Stack Frame visualization, let’s use this piece of code:
/* azeria@labs:~$ gcc func.c -o func && gdb func */
int main()
{
 int res = 0;
 int a = 1;
 int b = 2;
 res = max(a, b);
 return res;
}

int max(int a,int b)
{
 do_nothing();
 if(a<b)
 {
 return b;
 }
 else
 {
 return a;
 }
}
int do_nothing()
{
 return 0;
}
In the screenshot below we can see a simple illustration of a Stack Frame through the perspective of GDB debugger.
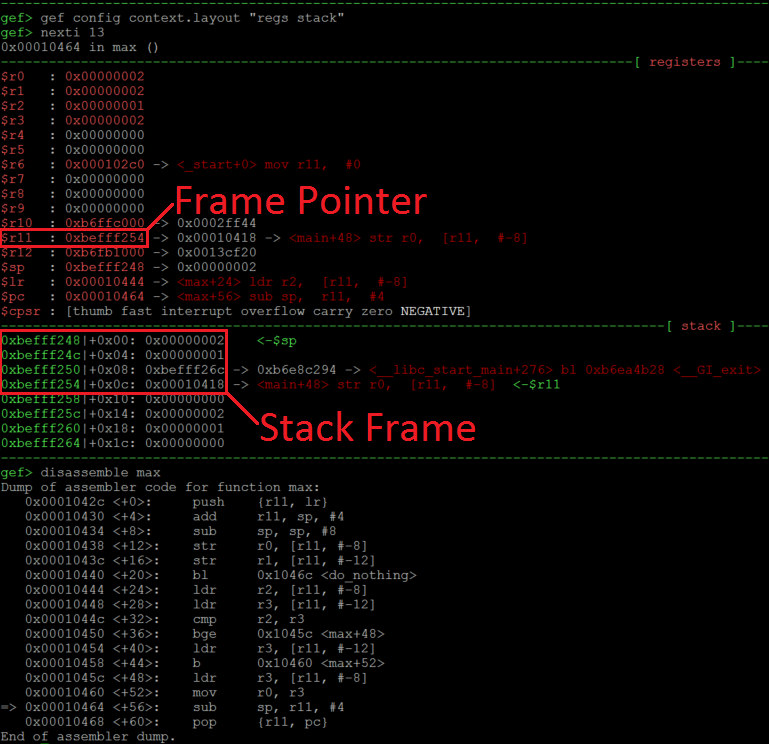
We can see in the picture above that currently we are about to leave the function max (see the arrow in the disassembly at the bottom). At this state, the FP (R11) points to 0xbefff254 which is the bottom of our Stack Frame. This address on the Stack (green addresses) stores 0x00010418 which is the return address (previous LR). 4 bytes above this (at 0xbefff250) we have a value 0xbefff26c, which is the address of a previous Frame Pointer. The 0x1 and 0x2 at addresses 0xbefff24c and 0xbefff248 are local variables which were used during the execution of the function max. So the Stack Frame which we just analyzed had only LR, FP and two local variables.
FUNCTIONS
To understand functions in ARM we first need to get familiar with the structural parts of a function, which are:
- Prologue
- Body
- Epilogue
The purpose of the prologue is to save the previous state of the program (by storing values of LR and R11 onto the Stack) and set up the Stack for the local variables of the function. While the implementation of the prologue may differ depending on a compiler that was used, generally this is done by using PUSH/ADD/SUB instructions. An example of a prologue would look like this:
push   {r11, lr}    /* Start of the prologue. Saving Frame Pointer and LR onto the stack */
add    r11, sp, #0  /* Setting up the bottom of the stack frame */
sub    sp, sp, #16  /* End of the prologue. Allocating some buffer on the stack. This also allocates space for the Stack Frame */
The body part of the function is usually responsible for some kind of unique and specific task. This part of the function may contain various instructions, branches (jumps) to other functions, etc. An example of a body section of a function can be as simple as the following few instructions:
mov    r0, #1       /* setting up local variables (a=1). This also serves as setting up the first parameter for the function max */
mov    r1, #2       /* setting up local variables (b=2). This also serves as setting up the second parameter for the function max */
bl     max          /* Calling/branching to function max */
The sample code above shows a snippet of a function which sets up local variables and then branches to another function. This piece of code also shows us that the parameters of a function (in this case function max) are passed via registers. In some cases, when there are more than 4 parameters to be passed, we would additionally use the Stack to store the remaining parameters. It is also worth mentioning, that a result of a function is returned via the register R0. So what ever the result of a function (max) turns out to be, we should be able to pick it up from the register R0 right after the return from the function. One more thing to point out is that in certain situations the result might be 64 bits in length (exceeds the size of a 32bit register). In that case we can use R0 combined with R1 to return a 64 bit result.
The last part of the function, the epilogue, is used to restore the program’s state to it’s initial one (before the function call) so that it can continue from where it left of. For that we need to readjust the Stack Pointer. This is done by using the Frame Pointer register (R11) as a reference and performing add or sub operation. Once we readjust the Stack Pointer, we restore the previously (in prologue) saved register values by poping them from the Stack into respective registers. Depending on the function type, the POP instruction might be the final instruction of the epilogue. However, it might be that after restoring the register values we use BX instruction for leaving the function. An example of an epilogue looks like this:
sub    sp, r11, #0  /* Start of the epilogue. Readjusting the Stack Pointer */
pop    {r11, pc}    /* End of the epilogue. Restoring Frame Pointer from the Stack, jumping to previously saved LR via direct load into PC. The Stack Frame of a function is finally destroyed at this step. */
So now we know, that:
- Prologue sets up the environment for the function;
- Body implements the function’s logic and stores result to R0;
- Epilogue restores the state so that the program can resume from where it left of before calling the function.
Another key point to know about the functions is their types: leaf and non-leaf. The leaf function is a kind of a function which does not call/branch to another function from itself. A non-leaf function is a kind of a function which in addition to it’s own logic’s does call/branch to another function. The implementation of these two kind of functions are similar. However, they have some differences. To analyze the differences of these functions we will use the following piece of code:
/* azeria@labs:~$ as func.s -o func.o && gcc func.o -o func && gdb func */
.global main

main:
    push   {r11, lr}    /* Start of the prologue. Saving Frame Pointer and LR onto the stack */
    add    r11, sp, #0  /* Setting up the bottom of the stack frame */
    sub    sp, sp, #16  /* End of the prologue. Allocating some buffer on the stack */
    mov    r0, #1       /* setting up local variables (a=1). This also serves as setting up the first parameter for the max function */
    mov    r1, #2       /* setting up local variables (b=2). This also serves as setting up the second parameter for the max function */
    bl     max          /* Calling/branching to function max */
    sub    sp, r11, #0  /* Start of the epilogue. Readjusting the Stack Pointer */
    pop    {r11, pc}    /* End of the epilogue. Restoring Frame pointer from the stack, jumping to previously saved LR via direct load into PC */

max:
    push   {r11}        /* Start of the prologue. Saving Frame Pointer onto the stack */
    add    r11, sp, #0  /* Setting up the bottom of the stack frame */
    sub    sp, sp, #12  /* End of the prologue. Allocating some buffer on the stack */
    cmp    r0, r1       /* Implementation of if(a<b) */
    movlt  r0, r1       /* if r0 was lower than r1, store r1 into r0 */
    add    sp, r11, #0  /* Start of the epilogue. Readjusting the Stack Pointer */
    pop    {r11}        /* restoring frame pointer */
    bx     lr           /* End of the epilogue. Jumping back to main via LR register */
The example above contains two functions: main, which is a non-leaf function, and max – a leaf function. As mentioned before, the non-leaf function calls/branches to another function, which is true in our case, because we branch to a function max from the function main. The function max in this case does not branch to another function within it’s body part, which makes it a leaf function.
Another key difference is the way the prologues and epilogues are implemented. The following example shows a comparison of prologues of a non-leaf and leaf functions:
/* A prologue of a non-leaf function */
push   {r11, lr}    /* Start of the prologue. Saving Frame Pointer and LR onto the stack */
add    r11, sp, #0  /* Setting up the bottom of the stack frame */
sub    sp, sp, #16  /* End of the prologue. Allocating some buffer on the stack */

/* A prologue of a leaf function */
push   {r11}        /* Start of the prologue. Saving Frame Pointer onto the stack */
add    r11, sp, #0  /* Setting up the bottom of the stack frame */
sub    sp, sp, #12  /* End of the prologue. Allocating some buffer on the stack */
The main difference here is that the entry of the prologue in the non-leaf function saves more register’s onto the stack. The reason behind this is that by the nature of the non-leaf function, the LR gets modified during the execution of such a function and therefore the value of this register needs to be preserved so that it can be restored later. Generally, the prologue could save even more registers if it’s necessary.
The comparison of the epilogues of the leaf and non-leaf functions, which we see below, shows us that the program’s flow is controlled in different ways: by branching to an address stored in the LR register in the leaf function’s case and by direct POP to PC register in the non-leaf function.
 /* An epilogue of a leaf function */
add    sp, r11, #0  /* Start of the epilogue. Readjusting the Stack Pointer */
pop    {r11}        /* restoring frame pointer */
bx     lr           /* End of the epilogue. Jumping back to main via LR register */

/* An epilogue of a non-leaf function */
sub    sp, r11, #0  /* Start of the epilogue. Readjusting the Stack Pointer */
pop    {r11, pc}    /* End of the epilogue. Restoring Frame pointer from the stack, jumping to previously saved LR via direct load into PC */
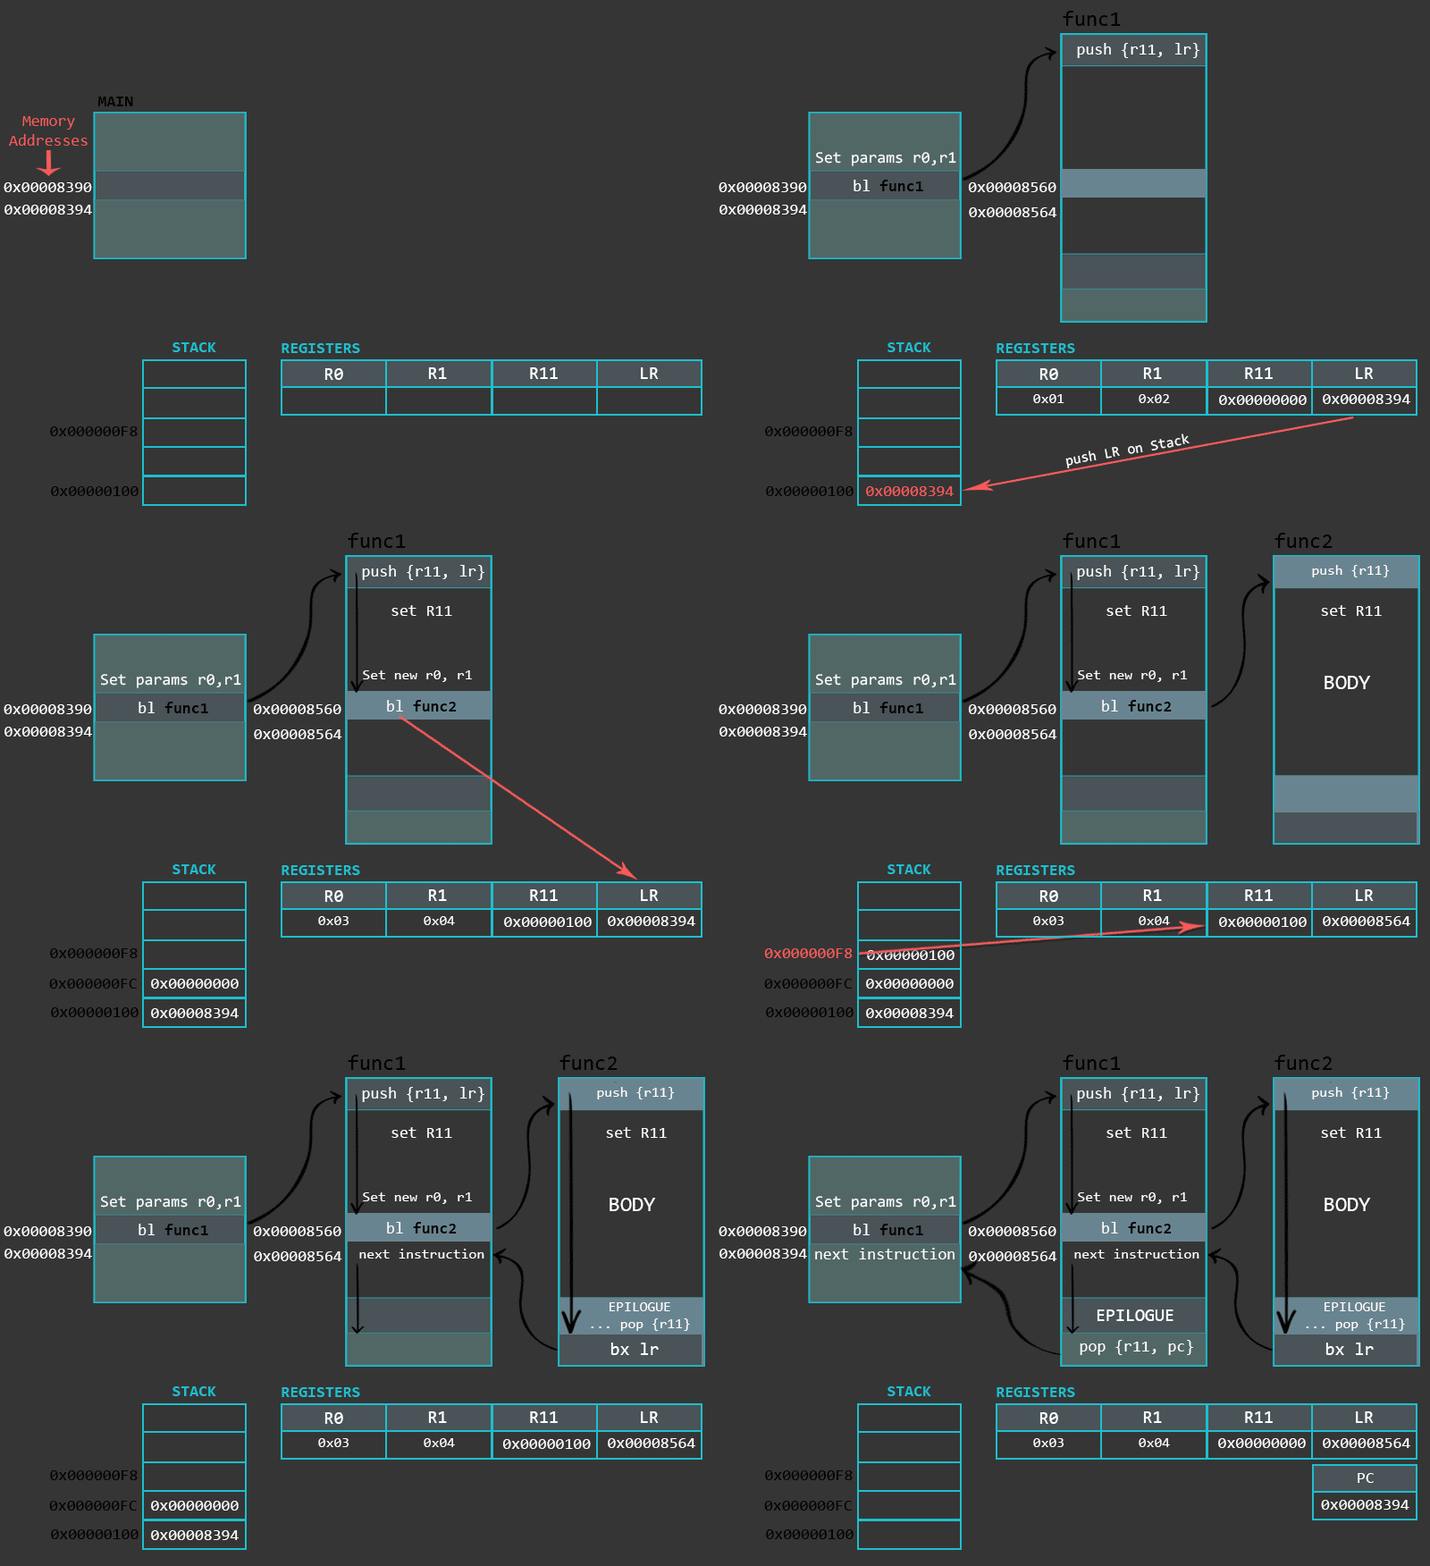
Finally, it is important to understand the use of BL and BX instructions here. In our example, we branched to a leaf function by using a BL instruction. We use the the label of a function as a parameter to initiate branching. During the compilation process, the label gets replaced with a memory address. Before jumping to that location, the address of the next instruction is saved (linked) to the LR register so that we can return back to where we left off when the function max is finished.
The BX instruction, which is used to leave the leaf function, takes LR register as a parameter. As mentioned earlier, before jumping to function max the BL instruction saved the address of the next instruction of the function main into the LR register. Due to the fact that the leaf function is not supposed to change the value of the LR register during it’s execution, this register can be now used to return to the parent (main) function. As explained in the previous chapter, the BX instruction can eXchange between the ARM/Thumb modes during branching operation. In this case, it is done by inspecting the last bit of the LR register: if the bit is set to 1, the CPU will change (or keep) the mode to thumb, if it’s set to 0, the mode will be changed (or kept) to ARM. This is a nice design feature which allows to call functions from different modes.
To take another perspective into functions and their internals we can examine the following animation which illustrates the inner workings of non-leaf and leaf functions.
